Building a DIY Off-Grid Solar Bank on my Roof
I’ve been fascinated with solar energy ever since I was a kid and my brother had a toy with a motor attached to a mini solar panel that you could run under a strong light. In recent years, solar panels have come down in price and now seemed like a good a time as any for me to experiment with it a bit. I took a week long staycation from work a few weeks ago, and in preparation, I did a bunch of research and bought a ton of components to set up an off grid solar thing. I chose to go off-grid because I didn’t want to deal with actually putting the power back into the grid and all the bureaucracy involved (I’m not sure if my power company even buys power back), and the scale I’m working at is super small anyway. Here are the components I used, and why I decided to go with them. They might not be the best choice, because I have no idea what I’m doing, but even so, I learned a lot in the process.
The Battery

As I was building an off-grid solar charging system, I needed something to store the energy gathered by the panel. My initial goal with the project was to charge the battery on my electric bike. The bike is something like 12Ah at 48v, so overall the capacity is about 580 watt hours. I only let the bike battery drain to about 80% at most, so I wanted to charge about 100 watt hours at a time.
The type of battery I got was a lead acid sealed AGM battery, which is apparently pretty safe and commonly used in this sort of application. After doing some research about these batteries, it sounds like they also last longer if you only let them discharge to about 60-80% of their capacity, so I got a battery that holds 660 watt hours (12v * 55 Ah). I could probably have gone with a bigger battery but this one only cost about $100.
I had no idea what sort of connector this battery used when I bought it, but it turns out that it’s a pretty common connector that uses a bolt. The inverter I ended up buying worked out of the box with it and I ended up buying a box of additional eyelet adaptors to make my own wires.
The Solar Panel

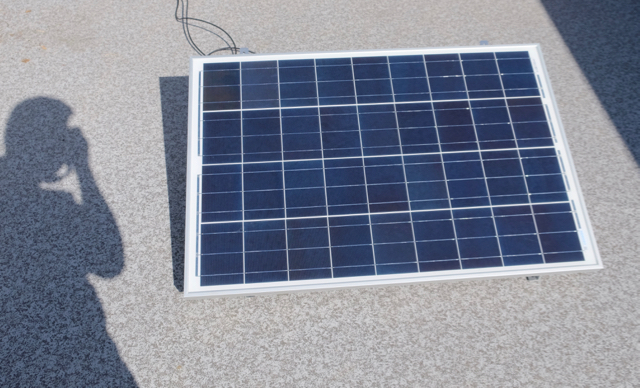
I wanted a panel that would be able to charge up my battery to a decent level each day. I ended up getting probably more capacity than needed, but I can always expand my project later. I bought a 100W polycrystalline (because it was cheaper than mono) panel by Renology because it had good ratings and a good price to watt ratio. The connectors on the panel are MC4 so I ended up buying some additional cable so I could connect the panel to a charge controller.
The Charge Controller

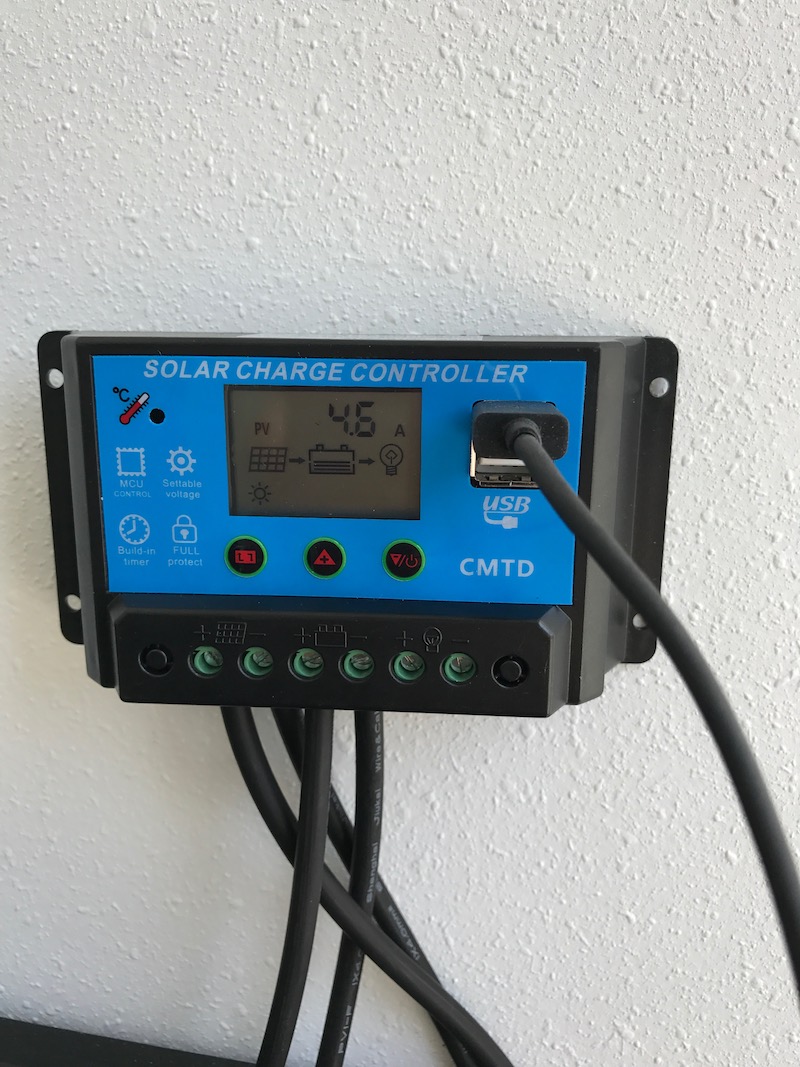
I ended up getting a cheap charge controller that came at a discount in exchange for me writing a review. I was going to buy one that looked similar anyway, though I’m not sure if it’s the same manufacturer or just a knock off of the one I was going to buy. Either way it is the perfect size for my project at 10A and shows info like the current voltage level of the battery and the amperage going into the battery as well as the load coming out of the usb ports and the load out connectors.
I assumed you were supposed to connect the load out directly to an inverter but I read a few posts about how that would be a bad idea. I’m guessing too much load would fry your charge controller.
The Inverter

I was looking for a pure sine wave inverter, which is supposed to be more efficient and nice to your electronic devices, but I couldn’t find one under $100 so I ended up getting an 800W inverter that seemed pretty solid. As I mentioned earlier, the connectors just worked for the battery, which was nice. I only use one outlet at a time, so I haven’t tested if this thing can actually throw out 800W, but it’s probably a good rule of thumb to get an inverter with more capacity than you’ll need on average anyway. My bike battery charger uses about 140W and a Macbook charger will use 80W. I’m not sure how many watts that is after efficiency lost with the inverter but it’s probably not too terrible.
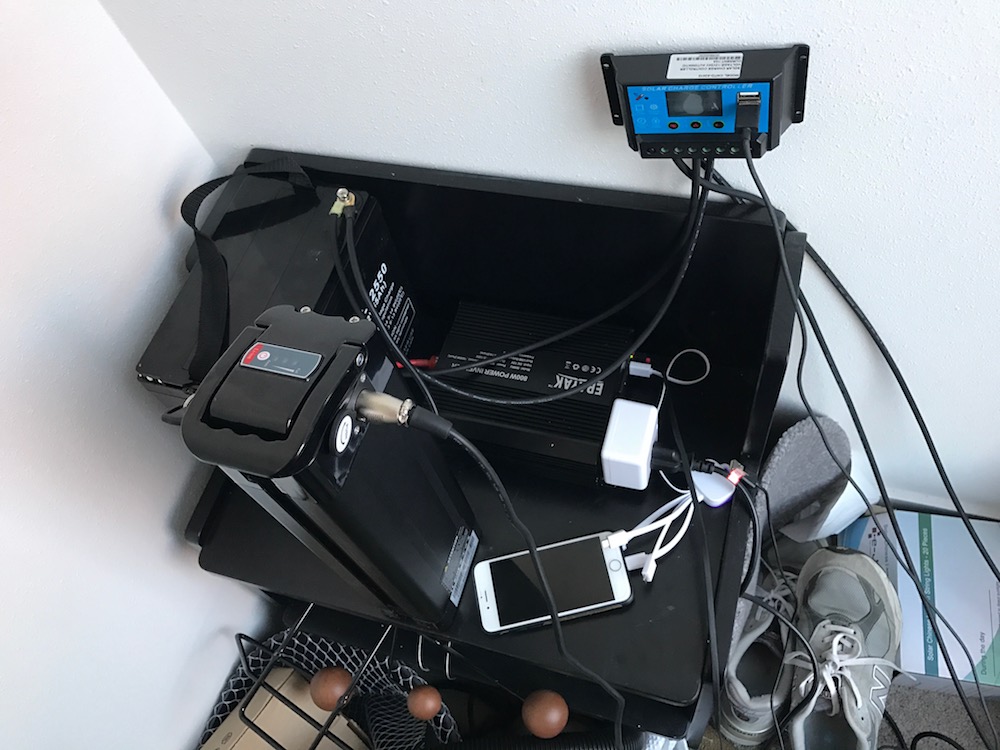
Putting it all together
After getting all of the parts I realized that I was missing the connection from the charge controller to the battery. I ended up buying some ringlet adapters that would fit the battery and cut off part of the long wire I bought to make a new wire. This worked better than I thought it would. After that, I was able to connect the panel and battery to the charge controller. I was able to read that the panel was giving something like 3 amps to the battery, which was amazing to me at the time.
I also connected the inverter to the battery and was able to run my bike charger. I attached my Smart Things outlet in between the outlet and the charger so I could monitor how much voltage the battery used. It’s interesting because once the battery reaches a certain charge, the charger tapers down its power usage slowly. Finally, I placed the panel on the roof, which was kind of difficult considering how tall the roof is and how short my ladder apparently is, plus how heavy the panel was and how much I’m able to lift above my head while also balancing on top of a ladder…
Here’s some photos of the system running just inside the door to the roof. I’ll probably set up a plank or something to drill the charge controller and inverter onto, since right now it’s a little janky.
Hopefully you found this interesting and are already planning an off grid solar system of your own. I’m happy to say that my ebike is now powered 100% by my project, as well as a bunch of electronics in my house. Also, my house has become a lot more valuable in the case of a zombie apocalypse.